Molding Processes
You’re surrounded by an endless number of these things in your everyday life — your phone case, the bottle cap, the remote control, the hair dryer, the toothbrush. Every one of them was born from one of these processes. Have you ever wondered how they’re made?
In general terms, polymer conversion (processing) methods are the ones that turn pellets or powders into products for practical use. There are several processing methods; here at All About Polymers we have chosen to divide them into molding processes, for those that require a mold, and extrusion processes, for those that require a die and run continuously.
There are several molding processes; here we cover the most widely used:
- Injection Molding
- Co-Injection and Bi-Injection
- Overmolding
- Compression Molding
- Rotational Molding (Rotomolding)
- For Injection Blow Molding (IBM) and Injection Stretch Blow Molding (ISBM), go to Processes 3 – Blow Molding.
“In general terms, polymer conversion (processing) methods are the ones that turn pellets or powders into products for practical use. ”
Converting pellets or powders into finished products requires thermal and kinetic energy (friction and pressure).
Every conversion process goes through three phases:
1. Plastification (plasticizing):
It’s the stage in which the material passes from the solid state to the plastic (molten) state, using heat energy to do so.
The temperature at which the polymer melts is called the melting point, and it develops differently in amorphous polymers than in crystalline ones.
Plasticizing takes place inside a unit called the plasticizing unit, which generally consists of a barrel (cylinder) with an internal screw responsible for friction and pressure.
A good plasticizing process rests on the quality of the melt, which is fundamental to forming a part.
2. Forming:
It’s the stage in which the melt passes from the plasticizing unit into the geometric space defined by the forming tool, which may be a mold or a die depending on the process.
3. Solidification:
This is the stage in which the formed melt loses heat energy by conduction through the tool, solidifying as the final product.
Injection Molding
Before we dive in, allow me a personal note. Injection molding is my area of expertise — since I have spent more than 30 years in it, this is the section where I’ll let myself go as deep as I can, however, if you’re interested in going deeper, in my book, Plastic Polymers you will be able to find it in more detail.
If you’re in high school or university, I’ll explain it just as if you were taking a class at school, step by step and at your own pace, with each idea building on the last. And if you’re a professional refreshing the details, you’ll find the depth you came for here. So make yourself comfortable — this is my favorite corner of the whole field, and I hope that shows.
Injection molding is a manufacturing process that produces parts by injecting molten material at high pressure into a mold, which gives the polymer its final shape.
In essence, resin pellets are fed through a hopper into a heated barrel (cylinder) where an internal screw melts and plasticizes them through heat and friction, then forces the melt under pressure into the cavities of a mold, where it cools and solidifies to the shape of the cavities.
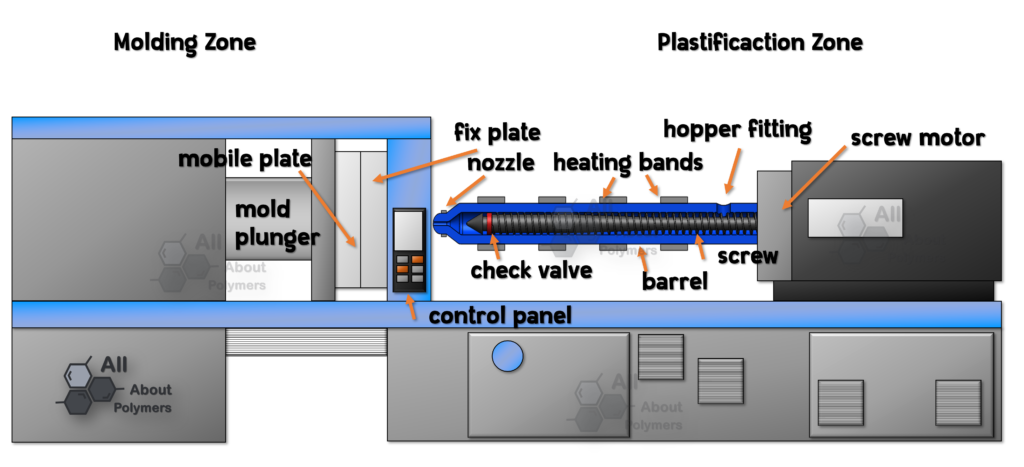
Molds can be single-cavity or multi-cavity. In multi-cavity molds, each cavity should ideally be identical so that the mold stays balanced, though some molds carry several geometries that form a complete set within a single cycle. They are generally made from tool steels, with stainless steels and aluminum molds suited to certain applications.
Within the barrel, the rising heat lowers the resin’s viscosity and lets the polymer flow under the force and motion of the injection unit, while the screw’s mechanical friction adds heat of its own and shortens the heating time. The screw also homogenizes the melt, evening out its viscosity and temperature.
“Injection molding is a manufacturing process that produces parts by injecting molten material at high pressure into a mold, which gives the polymer its final shape.”
As the screw rotates, the molten material moves forward and accumulates at the front of the screw — passing through a check valve — in a volume known as a shot. A shot is the volume of material used to fill the mold cavity, compensate for shrinkage, and provide a cushion to transfer pressure from the screw to the mold cavity. Once enough material has gathered, it is forced at high pressure and speed into the cavity to form a part.
The cushion is roughly 10% of the total shot volume and remains in the barrel at the end of the shot to prevent the screw from bottoming out against the front of the barrel.
The process is divided into several stages:
1. Injection (fill): the screw moves forward, injecting the molten material into the mold through the barrel nozzle.
2. Holding (pack & hold): once the screw reaches the front, it stays static in this position for several seconds, applying pressure against the resin in the mold cavities while it cools.
3. Cooling: once the gate of the cavities has solidified, the screw can retract. Cooling is made up of two parts: the screw-retraction time — also known as recovery time, since the screw draws more material from the hopper to prepare the next shot — and an extra time, also known as safety time, with which the molder ensures the material is solid enough to open the mold.
4. Mold opening
5. Ejection: once the mold opens, the parts are ejected from it by mechanical action (ejector pins) or by air.
6. Mold closing: at this point the cycle begins again with the injection of material.
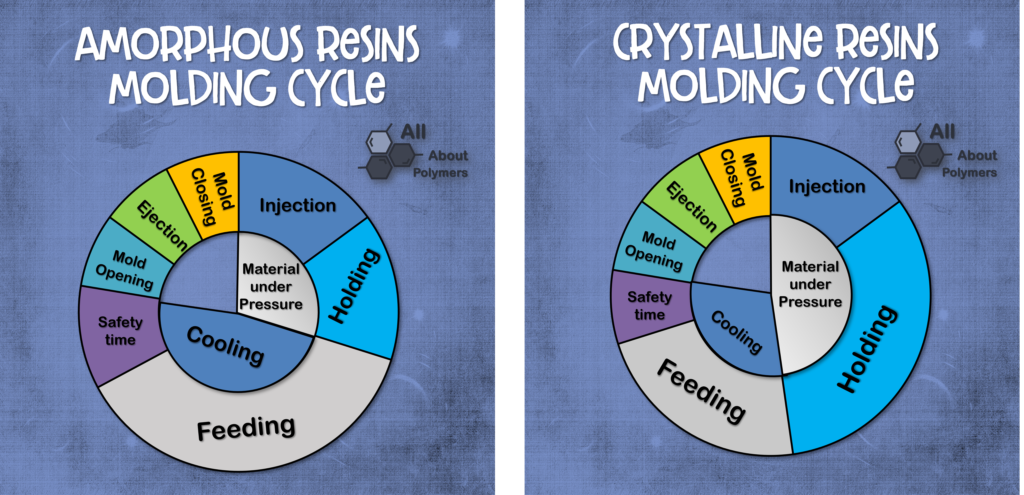
Because of the molecular ordering that the solidification of crystalline resins entails, as well as their melting point, the molding-cycle times differ between crystalline and amorphous resins. One very characteristic difference is the holding time, during which the screw stays at the front exerting pressure on the cavity until, on the one hand, the resin achieves its molecular ordering and, on the other, the gate cools.
Most crystalline resins require a hot mold to achieve this molecular ordering. For this reason, parts made with crystalline resins cannot have very thick walls; otherwise there would be a great deal of warpage, sink marks, and dimensional instability.
In the case of amorphous resins, a rather cold mold is important to achieve maximum transparency. Since molecular ordering is minimal, parts made with amorphous resins can have thick walls.
The following figures show the molding cycle for crystalline resins and for amorphous resins.
In the case of thermosetting (thermoset) resins, two different chemical components are typically injected into the barrel. These components immediately begin irreversible chemical reactions that eventually cross-link the material into a single connected network of molecules. As the chemical reaction proceeds, the two fluid components are permanently transformed into a viscoelastic solid.
Solidification inside the barrel and injection screw can be problematic, with financial repercussions; therefore, minimizing thermoset cure inside the cylinder is vital. This normally means that the residence time and temperature of the chemical precursors are minimized in the injection unit. Residence time can be reduced by using a small barrel and maximizing cycle times. These factors have led to the use of a cooled, insulated injection unit that injects the reacting chemicals into a thermally insulated, heated mold, which raises the speed of the chemical reactions and results in a shorter time required to achieve a solid thermoset component. After the part has solidified, the valves close to isolate the injection system and chemical precursors, and the mold opens to eject the molded parts. The mold then closes and the process repeats.
“Because of the molecular ordering that the solidification of crystalline resins entails, as well as their melting point, the molding-cycle times differ between crystalline and amorphous resins.”
The Injection Mold
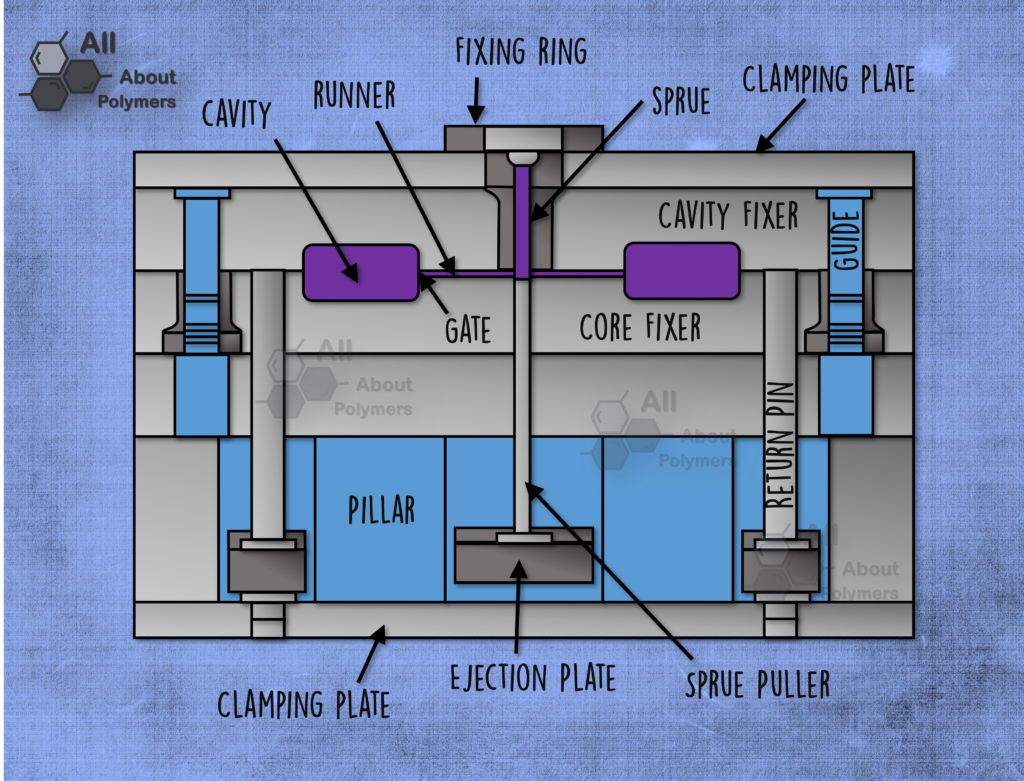
The mold is the fundamental tool in injection molding; it is where the plastic enters molten into the cavity with the shape it will take once it cools. It is made up of a series of important elements, such as the cavity, the runner (the plastic channel formed as the part cavity fills), the part ejector pins, and the sprue (the piece of plastic formed just after the nozzle of the injection unit, at the entrance to the mold), as well as clamping and ejection components. Here is a diagram:
Co-Injection
Co-injection molding is a process in which two or more different polymers are laminated together by injection molding. These polymers may be identical except for color or hardness, or they may be different types of polymers. When different polymers are used, they must be compatible (able to bond) and must melt at approximately the same temperature.
The term co-injection can denote different processes, such as forming a sandwich, double-shot injection, multi-shot injection, or structural foam molding. Whatever its name, the result is a layered, sandwich-like structure that combines the different properties of each material. Commonly, the outer material is solid while the inner material is foamed. However, any combination of outer and inner material — foamed or not — is possible. For thick-walled parts, cooling time can be reduced substantially by running the outer material at a higher temperature for a smooth surface and the inner material — which essentially sets the cycle time — at a lower temperature.
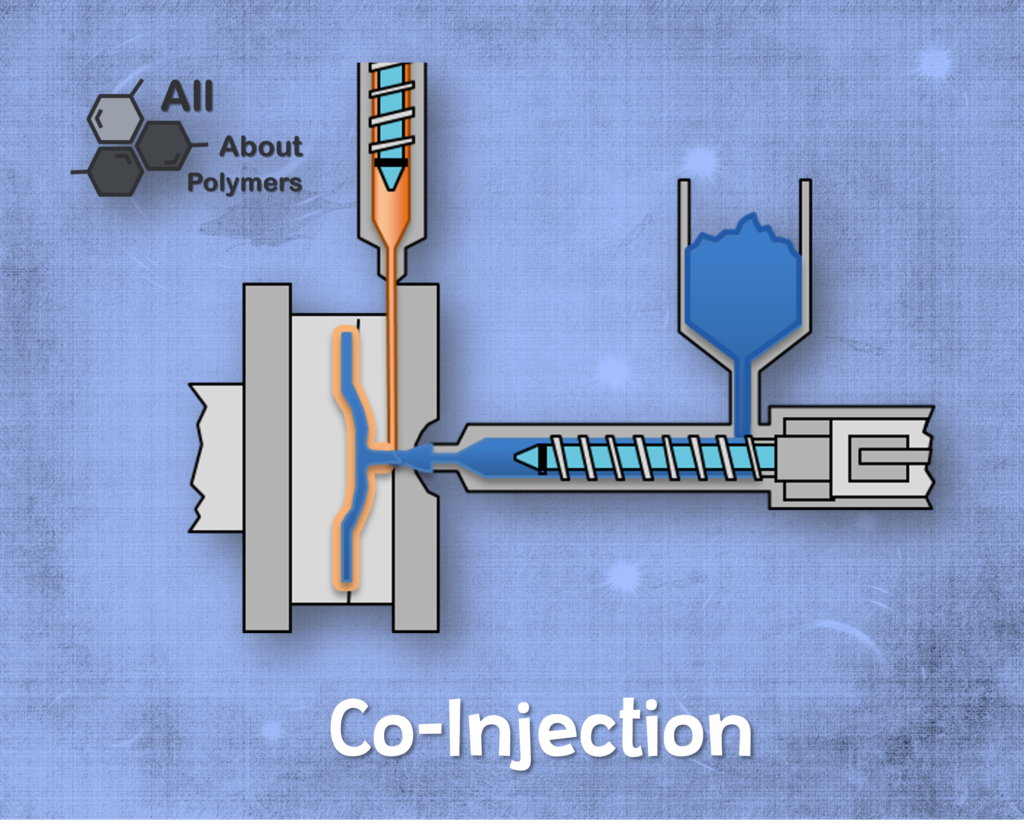
Co-injection molding can use 1, 2, or 3 channels. In the single-channel system, the molten plastics are injected sequentially into the mold by switching the valve. Because of the flow characteristics of the melt and the tendency of the outer material to adhere to a colder mold surface, a dense solid skin forms. Skin thickness can be controlled by varying injection speed, melt temperature, and the flow compatibility of the materials.
In the 2-channel system, sequential or simultaneous injection of the outer and inner materials is possible. This allows control of the outer-material thickness, especially at the gates on both sides of the part. In this type of molding, it is best to profile the filling of the cavity. Profiling the injection speed allows greater control over the surface appearance.
The 3-channel system allows simultaneous injection with a direct gate at the sprue. The thickness of the outer material can be influenced on both sides of the part. With this system, the foamed inner material advances farther toward the end of the flow channel than with the 1- and 2-channel techniques. The part can be designed to be lighter in weight.
Bi-Injection
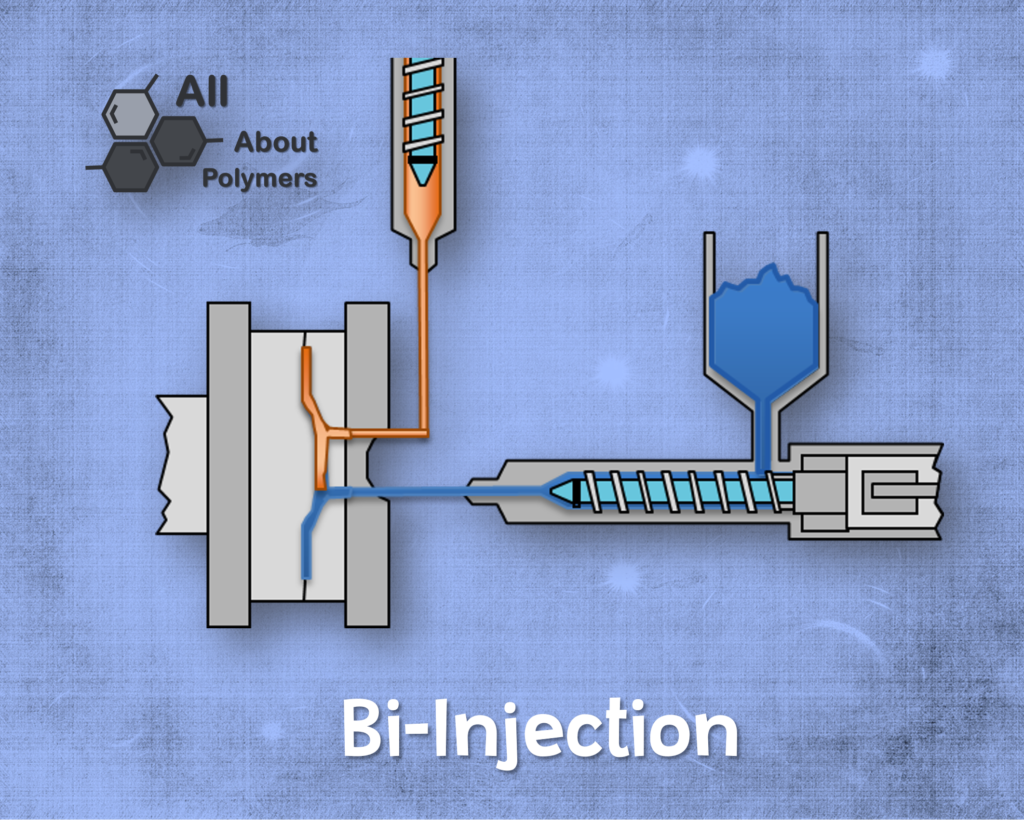
Bi-injection is the simplest variant of two-component injection molding from the standpoint of the machine and the mold: the cavity is filled simultaneously with two distinct components coming from two different gates. The challenge of this technique is that, when injecting two different components, the weld line formed where they meet ends up somewhat uncontrolled.
The position of the line between the colors can be defined by adjusting the injection speeds.
Overmolding
Overmolding is injection molding in which a material is injected over a part or insert made of the same or another material.
Two-step molding is a type of overmolding in which the insert is made of the same material. The second injection can cover the whole insert or just a few selected surfaces.
Overmolding can be done on the same machine with a rotating carousel, or on a second machine.
Two injection molding processes dominate the manufacture of overmolded products: insert overmolding and multi-shot molding.
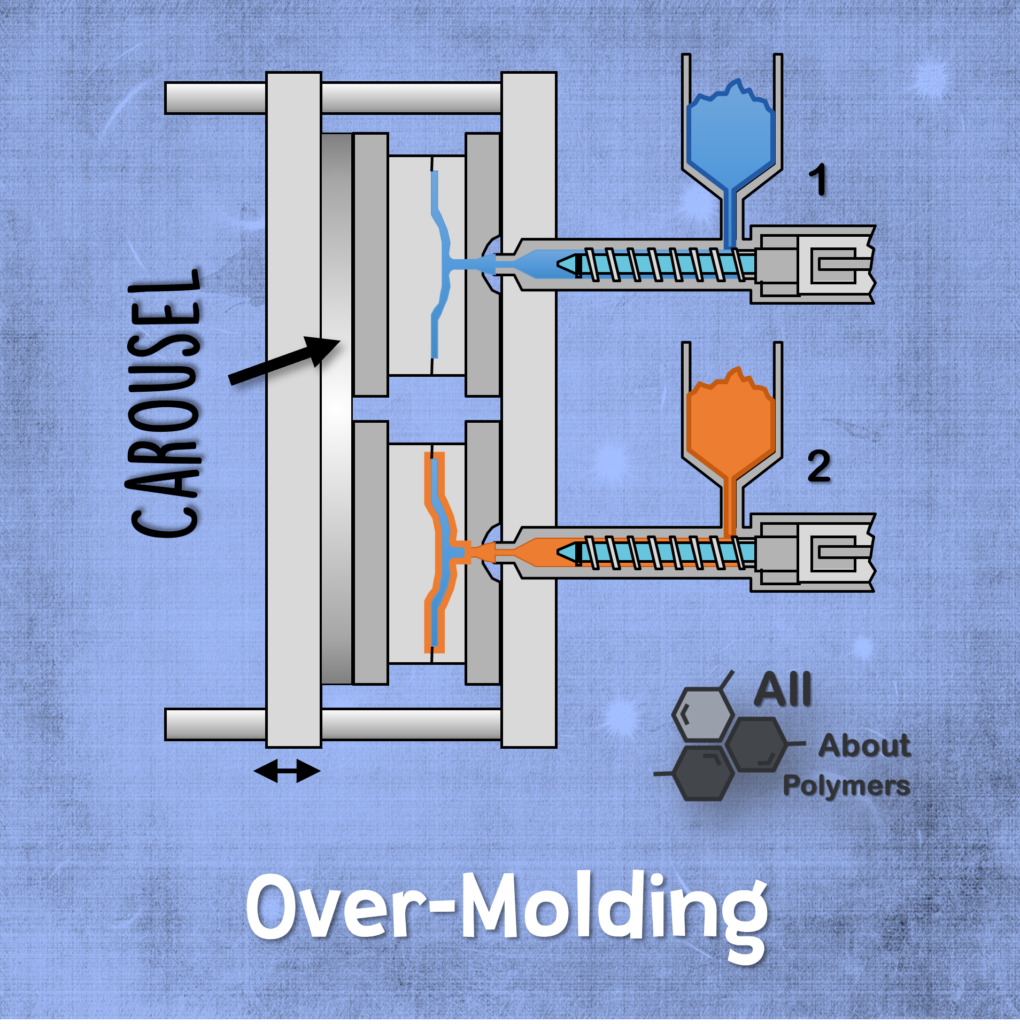
The most widely used process is insert overmolding, in which a previously molded insert is placed in a mold and a resin is injected directly over it. For molders, the advantage of insert overmolding is that conventional machines can be used, and the tooling costs associated with insert overmolding are lower than for multi-shot molding. Multi-shot molding (also called multiple molding or two-shot molding) requires a special or adapted molding machine with two or more barrels, allowing two or more materials to be injected into the same mold during the same molding cycle. The molder may select multi-shot molding to reduce cycle times and achieve higher quality while lowering production costs.
In insert overmolding, the insert or preform must be placed in the mold manually or by a robot before each shot.
Overmolding allows a good variety of products to be produced, including assemblies in the same mold. It is often used to provide a soft-touch finish over a rigid housing. Examples of these applications include tools, brushes, household appliances, pens, and so on.
Compression Molding
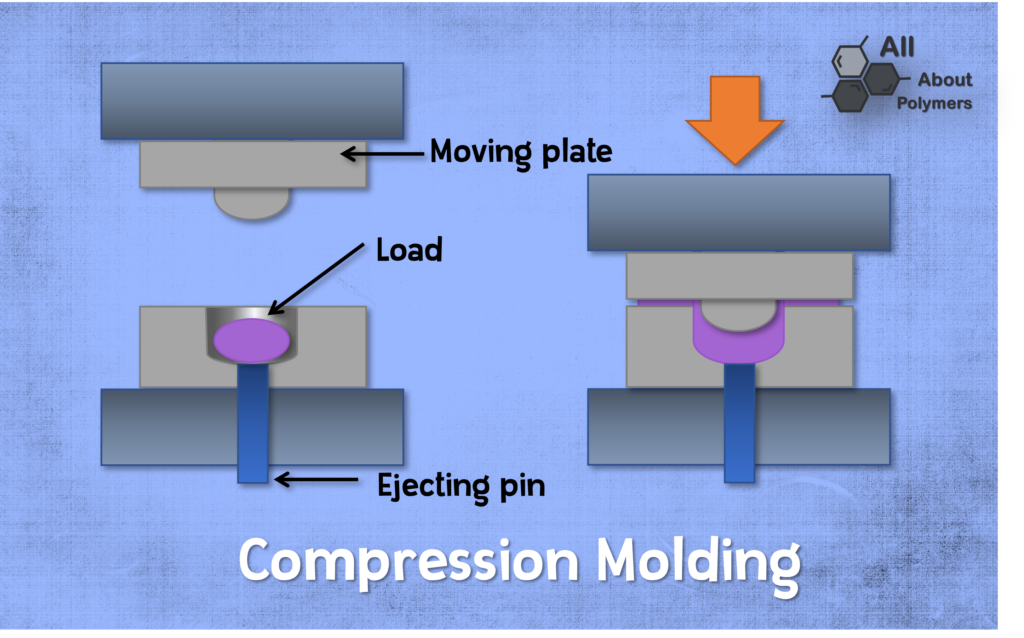
Compression molding is a part-forming process in which the polymer, as a powder or putty, is placed into an open, heated mold; pressure is then applied so that the material takes the shape of the mold and cross-links with the heat.
The mold is closed by applying force from the top; pressure is applied to force the material into contact with all areas of the mold, while heat and pressure are maintained until the resin has cured (cross-linked).
Although compression molding can be used with both thermosetting and thermoplastic resins, today nearly all applications use thermosetting resins, with some advanced compounds using thermoplastic resins. In the thermoplastic case, the material does not cross-link but instead takes on a fixed shape thanks to the orientation of the molecular chains during compression.
In some cases, the cross-linking of thermosets can be accelerated by adding a catalyst or cross-linking agent.
“Two-step molding is a type of overmolding in which the insert is made of the same material. The second injection can cover the whole insert or just a few selected surfaces.”
The process uses thermosetting resins in a partially cured state, whether as pellets, putties, or preforms.
The advantage of compression molding is its ability to mold large parts with complex designs. It is also one of the lowest-cost molding methods compared with others such as transfer molding and injection molding.
In addition, it wastes relatively little material, giving it an edge when working with expensive compounds. However, compression molding often provides poor product consistency and difficulty controlling flash, and it is not suitable for certain types of parts.
Compression molding is also suitable for the mass production of basic parts in sizes larger than those of extrusion. The most commonly used materials in compression molding are: glass-fiber polyester systems, Torlon, Vespel, polyphenylsulfone (PPS), and polyether-ester ketones (PEEK).
Rotational Molding
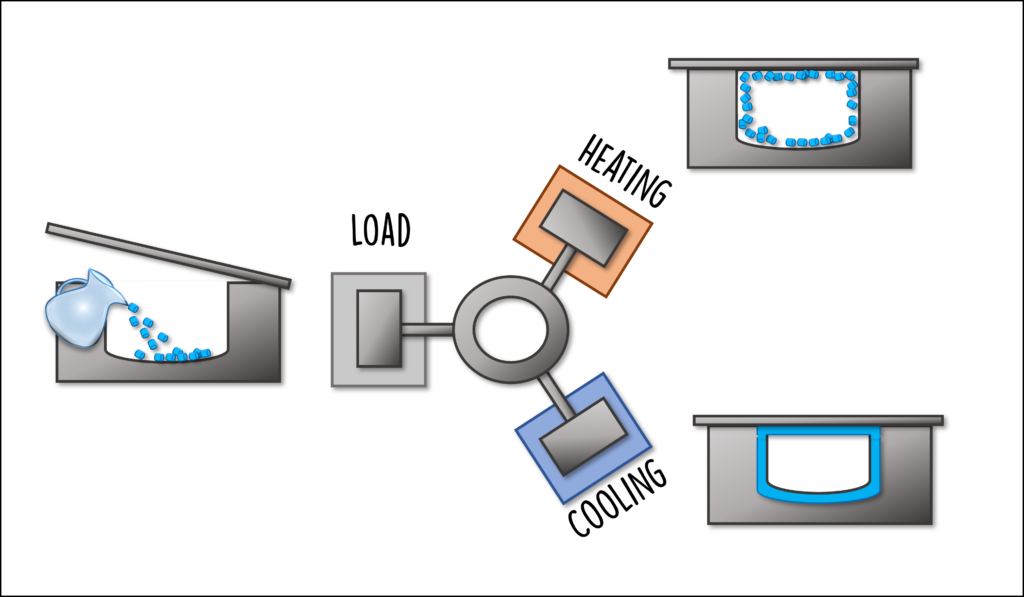
Rotational Molding (Rotomolding) is a process for thermoplastic resins used to produce hollow parts. It consists of a hollow, heated mold that is filled with a charge or weight of powdered or liquid material, which is then rotated slowly (generally about two perpendicular axes) in an oven, causing the softened material to disperse and stick to the mold walls.
To maintain a uniform thickness throughout the part, the mold keeps rotating at all times during the heating phase and — to prevent sagging or deformation — also rotates during the cooling phase. The process is slow and restricted to a small number of plastics.
In summary, rotational molding consists of 4 steps:
- Filling the mold
- Heating the mold while it rotates
- Cooling the mold while it rotates (solidification of the resin)
- Removing the part from the mold
Another form of rotomolding is rotational casting (rotocasting); the difference is that this one uses self-curing resins in an unheated mold, but it shares the slow rotation speeds in common with rotational molding.